- 4 posts on the background to the case
- 2 posts on the possible crash sites
- 3 posts on the timing of events (based on released documents)
Now I’m ready to look at the police evidence about the crash itself.
Perhaps cheekily I’ve titled this post ‘Crash Analysis’ because I have no expertise in this area. I have read no analysis of this crash. In fact, I’ve not even seen questions being asked about the crash and the available evidence.
I feel I have no option but to step in. Just as it was important to attempt to built a time framework it’s necessary to look at, try to interpret and question, the evidence.
Once again I acknowledge that there may be no fruits from these labours. So be it. I need to do this for me, if for no other reason.
Once again I ask that you bear with me as I indulge my ‘desires’.
Firstly, let’s look at the evidence which is of three forms,
- diagram
- photos
Statement
Last year, the COPFS (Crown Office and Procurator Fiscal Service) responded to Steven Semple’s FOI by refusing to release additional information but also by issuing Annex A (here)
Therefore, there should be no information in Annex A which is new to us. Later we’ll see if that is accurate.
The key part of Annex A, as regards the ‘crash’ itself, is
The implication here is that the car was out out of control more than 60 yards before the point at which it finally left the road.
Diagram
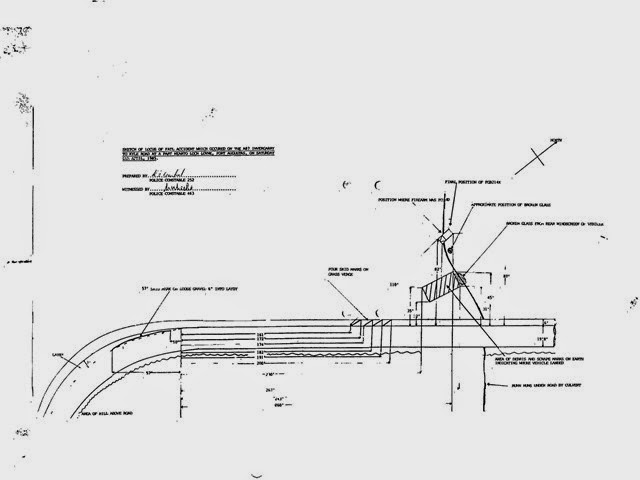
The diagram was made available by Northern Constabulary and as a response to Andy Muirhead’s FOI. You’ll find it here. [Note: when you click on the link you’ll find that it opens in portrait which makes it very difficult to read. Download the image and rotate or rotate it within your browser if you can.]
You’ll probably find that, to read this image, you’ll need to view it in a photo viewer. Even then you’ll find some of the writing difficult to read and so I appended the pic below to try to make it clearer.
Again this is too small but you can download a copy from here.
You’ll see that this diagram shows the 57 feet skid, the four skid marks on the verge, the car’s final resting place and what seems to be the spot where the car landed and flipped over and where the rear window popped out.
Photos
Now, the police photographs. 


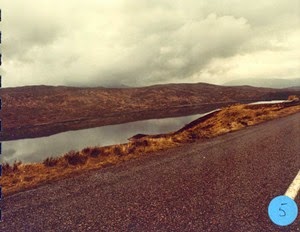


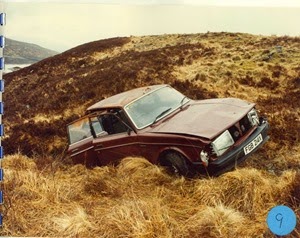

We would expect these photographs to have captured the key features detailed in the diagram and the statement. We’ll see.
Car’s Final Position
Rather than starting at the beginning of the 57 feet skid, I am going to the end to show how the car, in my opinion, is likely to have come to rest where it did. I do this because this is the easiest part to work on.


These images show the car upright facing back towards its direction of travel.
There are only two ways such a position could happen:
| - | car stays on its wheels and the ground contours ‘direct’ the car to its final position | |
| - | car turns over its front end and then rolls into its final position. |
We can ignore option 1 because this photo
shows damage to the roof and the tops of the doors and windows discoloured by vegetation. It is clear, therefore, that the car has rolled to get to its final position.
The photo below shows that the car was upright in the arrowed region.
The series of diagrams below shows how the car could end up facing back towards the direction in which left the road.
We start at top right with the initial direction of travel being right-to-left. The front of the car stops - having hit an obstruction (eg the far edge of the burn), the car rotates around the front – red axis in the first pic. The car then is upside down (as in pic 2). The photo directly above these pics shows the ground falls away sharply below the car and, therefore, the upside down car rotates about its long edge (red axis) and its finishing position is upright and facing back towards its direction of travel.
It’s quite possible that McRae’s car, having returned to its upright position as in pic 3 above, continues to do another 360o rotation to end up further down the slope but still on its wheels in the same orientation.
Having demonstrated, I hope, that the final position of McRae’s car is easily explained let’s go back to the start – the 57 feet skid in the lay-by.
Lay-by Skid
Annex A says this,
The locus map (appended by me) shows
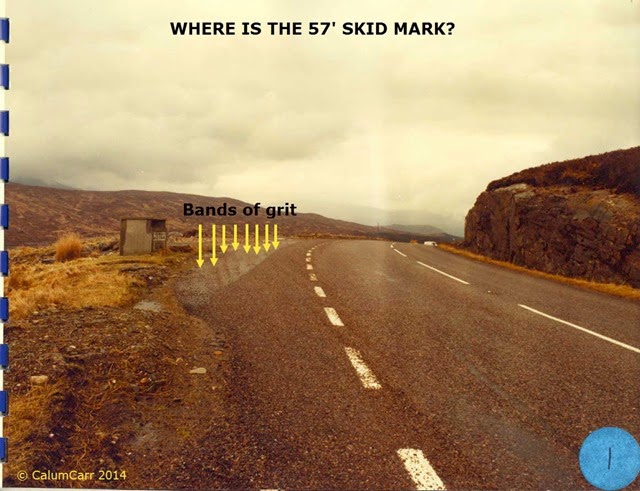
What we need to look for in the police photographs, therefore, is a long line in the loose grit, just on the layby side of the dotted white line and which ends only ten feet from the end of the layby and the corner.
I don’t see this long line in either of the two layby photos.
Do you?
In the upper photo I see several bands of grit but nothing in the correct area.
In the lower photo I can see a line but it ends much further than 10 feet from the end of the layby. What I’m seeing might just be an artefact of digitisation. I have marked it with a yellow line. Can you see it in the original above? Do you think it is the skid mark referred to?
The records also show that the skid mark stops 10 feet from the end of the layby. The line I marked is much further than 10 feet from the end of the layby. I’ve magnified the image.
The black arrow highlights the one part of the broken line which edges the layby. There are 10 such parts between the end of my marked line (black cross). When I look at photo 1 I would estimate each line to be at least 1 foot with the gap between lines being the same. On this basis my marked line ends 20 feet before the end of the layby and so cannot be the skid mark referred to in official documents.
The yellow arrow shows the point I estimate is 10 feet from the layby’s end.
Well, I’m not convinced. I can’t see the ’official’ skid mark. I’m not saying that it isn’t there but, if it is present, the photos do not show it.
Marks on Verge
Annex A states that there are no marks on the road between the end of the 57’ skid and the start of the 4 skid marks on the verge which is 171 feet beyond the layby mark.
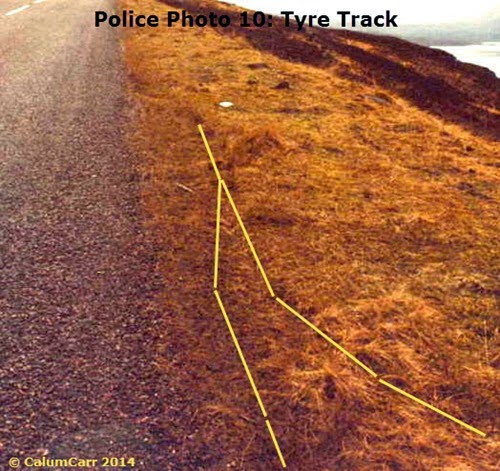
There is an interesting photo, however, which shows, not a mark on the road, but one on the grass verge (photo 7).
Below, in a cropped, lightened and magnified version, we can see a tyre track.
In case the track isn’t clear I’ve marked it .
It’s not clear why the original photo was taken. Was it to show tyre tracks belonging to McRae’s car? No mention is made of this feature in Annex A or in the locus map.
Regardless of the official reason, this photo is valuable because it shows what happens when a tyre, which is turning as opposed to skidding, rolls over a grass verge. The tread creates an imprint on the surface. There is no tearing of the surface.
Four Skid Marks on Verge
Now contrast that with official photo 6.
This pic has some confusing features which I’ll return to but let’s concentrate on the rightmost mark – arrowed below.
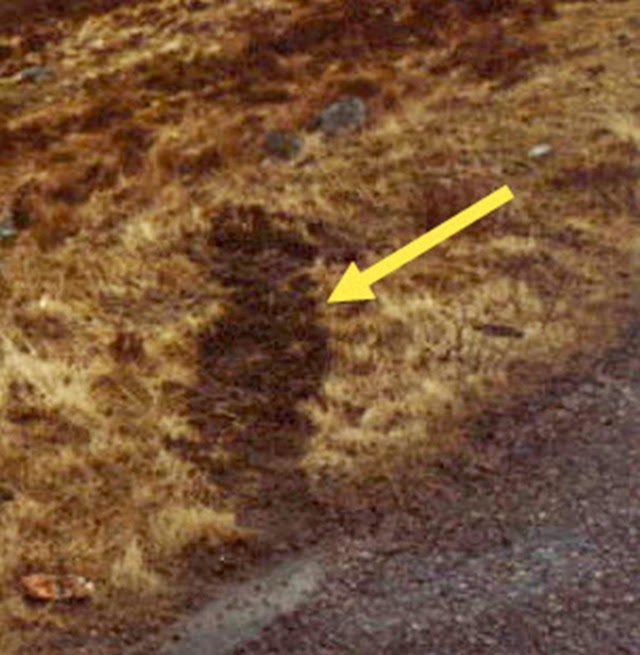
This is very different from the tyre track on the verge (up 2 pics). Here the ground has been ripped, the surface destroyed.
The only possible cause, which I can see, is that the tyre was not turning but was sliding. I take my conjecture further. It seems as though the damage is caused by a tyre which is turned across the direction of travel. Is that clear? Perhaps I should show what I mean in another pic. 
The arrow shows the direction of travel and the green ring represents a tyre turned across that direction. Please bear in mind that my picture shows the tyre turned at 90o to the direction of travel. I think similar damage could be cause with the tyre turned through smaller angles.
Please remember too that this is conjecture only.
There’s a risk of moving too quickly and making a story out of my little thesis. Too easy it would be to say that the tyre was turned across the direction of travel because the driver was attempting to keep his car on the road. That might be but we would be wrong to assume that no other possibilities exist.
For example, the wheels could be in a neutral position but the car could be sliding, almost sideways, in the direction of the yellow arrow. In this scenario the wheel would be oriented in exactly the same way relative to the grass verge.
Let’s go back and find the four skid marks in one photo. 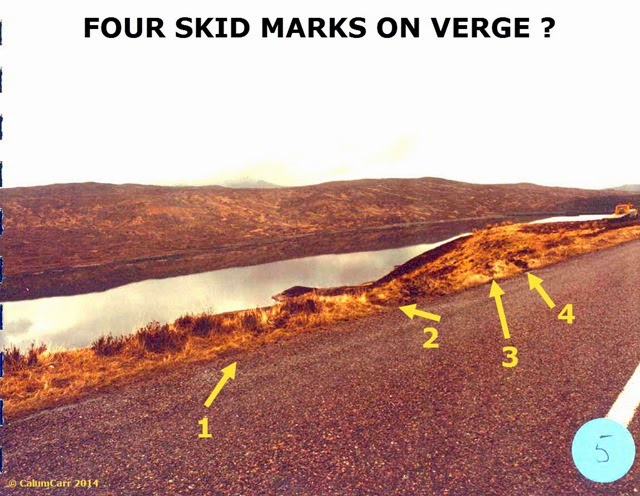
I think these are the four but I’m not sure. I think 2, 3 and 4 are correct but as for 1? I’m not sure. Just to the right of arrow 1 there seems to be a track on the road. Do you see it?
I’ve highlighted it in the pic below. 
Do you see it now?
With such uncertainty I don’t think I can do any more with the actual marks.
Let’s go back to the Locus diagram to see if we can make any sense of the skid marks. 
Again I’m confused. The distances between the starts of marks are
| Mark 1 | M2 | M3 | M4 |
| 161 | 174 | 182 | 191 |
| 13 feet | 8 feet | 9 feet |
But, when I look back to my arrowed photo of the marks, the distance between 3 and 4 is tiny and is certainly not 9 feet.
Despite the confusion I have to leave the photo behind and concentrate on the diagram AND treat it as though it is accurate.
The data below show the distances between the two front wheels, the two rear wheels and between the front and rear wheels for a Volvo 244 saloon, the model driven by McRae
 [Source]
The red line shows the direction of North.
The blue arrows follow the track of the skid marks in the diagram and show the movement of the car in an almost northerly direction. To account for the large spacing between the marks there must be a component of movement (green arrow) which is parallel to the road.
Now that all seems quite logical and reasonable BUT it is no more than my simple interpretation of the evidence provided by the authorities.
I might very well be wrong. Please bear that in mind.
Evidence of Car being Forced off Road?
One theory has it that McRae was forced off the road by another vehicle, another that McRae tried to force another vehicle off the road but ended up himself in that place.
I looked at three photos (Macrae11, 12 and 13) for evidence of contact between two vehicles. If you click on the three images they’ll open in your browser and you can easily magnify the image several times over. [In Chrome, I can magnify the photo by a factor of 5.]


The car is covered in bumps but I must disregard those as evidence of two vehicles coming together because they could have arisen from its travelling down the embankment and subsequent turning over.
What is left is to look for scrapes and scratches …. and I can find none.
The released photographs provide no evidence that either McRae was forced off the road or that he tried to force off another vehicle BUT this in no way is conclusive because we cannot see the entire car, because some of the bumps could have arisen from a coming together and because contact isn’t necessary to force a car off the road.
Looking for scrapes was a long-shot and, despite finding none, nothing can be ruled in or out.
That’s the meat of this post finished but I feel it has been such a hotchpotch that I need to pull it together as well as make some general comments.
Summary
I looked at five aspects the ‘crash’:
- layby skid
- track on the grass verge
- four skid marks on the verge
- car being forced off road
using the 3 formats in which the evidence was provided (Annex A statement, photographs and locus map and diagram).
Final Position Initially I was surprised by the positioning but, after a little thought, I saw that with two simple mechanisms (turning over its front and then over its side) the car could end up where it did.
Layby Skid Annex A and the diagram mention a skid mark, 57 feet long, in the layby about 60 yards from where the car left the road. In neither of the relevant photos could I see the skid mark in the detailed position.
Track on Grass Verge This wasn’t mentioned in Annex A nor shown on the diagram but a photo (McRae 10) clearly showed a track. I don’t know why this feature was photographed but not mentioned elsewhere.
My interpretation was that the mark was made by a tyre which was turning, as opposed to being stopped and skidding. I noted the contrast with the four skid marks on the verge.
Four Skid marks on the Verge I struggled with this. I couldn’t match up the diagram to the photos and had to take the diagram as being accurate. The only way I could reconcile the distances between the marks was to propose two main components acting on the car: movement in a largely northerly direction in line with the skid marks and also movement parallel to the road.
I may be wrong!
For one of the marks (no. 4 in my arrowed pic) I suggest that the damage to the ground is caused not by a rotating wheel but by a wheel which is turned across the (northerly) direction of travel.
Again I may be wrong!
Why do I say so freely that I may be wrong? Because I don’t want my suggestions to be stated by others as being factual. I may be right but I may also be wrong.
Evidence of Car being Forced off Road? I looked for scrapes and scratches on McRae’s car which might have indicated contact with another vehicle. I found none.
I had to disregard any bumps or dents given we know that the car turned over twice, at least, before it reached its resting place.
Not finding scratches does NOT rule out the possibility that McRae was forced off the road. Simply I found no evidence in the documents released by the authorities.
General Comments I raised questions about the timings of the photos and diagram in Parts 7 to 9.
The released documents are bare of any worthwhile analysis.
We know the diagram was prepared by Constable Crawford who was on duty in Fort Augustus when the first call was put through on the Saturday morning (6 April) - see Part 7. We know too that he was in Fort Augustus at 15.30 on that day when the car was being examined at the local garage.
It is reasonable to assume – but it is an assumption – that PC Crawford took photographs and measured the scene between McRae leaving for hospital and the car being moved to Fort Augustus. (In Parts 7 and 8 I estimate times at which certain events happened.)
It is reasonable to assume – but it is an assumption – that PC Crawford believed the site to be a place of an accident and not a potential scene of suicide or murder.
It is reasonable to assume – but it is an assumption – that PC Crawford arranged to have the car removed.
Given these assumptions, it is reasonable that the initial investigation was as simple as it appears to be from the released documents.
There is nothing in the released documents which leads me to question the view that the ’crash’ was an accident but that is not surprising because there is nothing in those documents to show that any other possibility was, at that time, considered or investigated.
[originally posted 12 January 2015]
If you have thoughts, or more, feel free to:
email me at calumsblogATgmailDOTcom or
tweet me at @calumcarr
© CalumCarr 2015
__________________________________________________________________
COPYRIGHT
Copyright over this article is retained by me, CalumCarr.
Please feel free to reproduce extracts and images provided you attribute the words and images to me taking into account the provisos below.
If you wish to use more than one quarter of the article then contact me for permission at calumsblogATgmailDOTcom.
I retain copyright over all modified images.
Copyright of the original unmodified images is retained by their respective original owners and to this end I name: Police Scotland, Car Blueprint and carinfo.com


